
whitex
Well-Known Member
- Joined
- Jul 30, 2021
- Threads
- 87
- Messages
- 8,193
- Reaction score
- 7,236
- Location
- WA, USA
- Vehicles
- 2023 Taycan TCT, 2024 Q8 eTron P+
- Thread starter
- #1
I am posting this description on how to use the Taycan dashcam prewire option to install a Blackvue, 2-channel dashcam and a Valentine one radar detector. This allows you to wire in a dashcam front and back, plus a radar detector, using existing Porsche wiring (no need to run cables to the fuse panel or front-to-back, through to the hatch on CT/ST).
Note: Thanks to @fastlorenzo for posting results of his pre-wire investigation in another thread. His information saved me a bunch of time. This post is intended to save even more time to the next person attempting to use Taycan dashcam pre-wire to install a dashcam, radar detector, or other accessories.
Some information on the dashcam pre-wire:
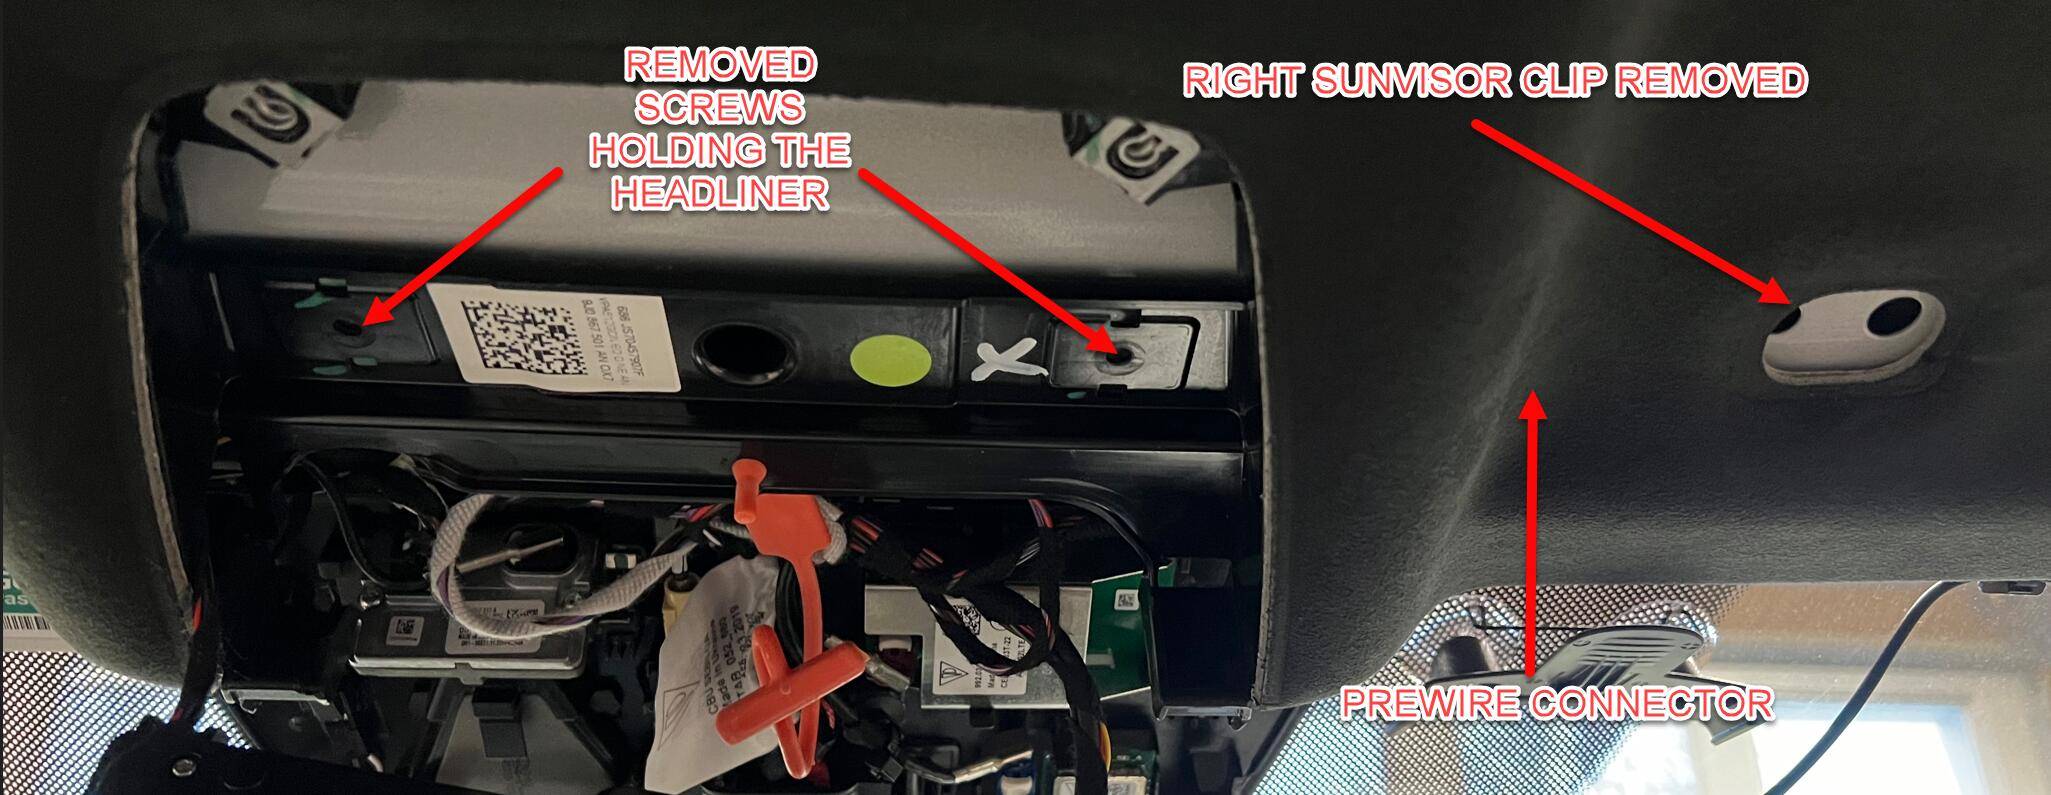
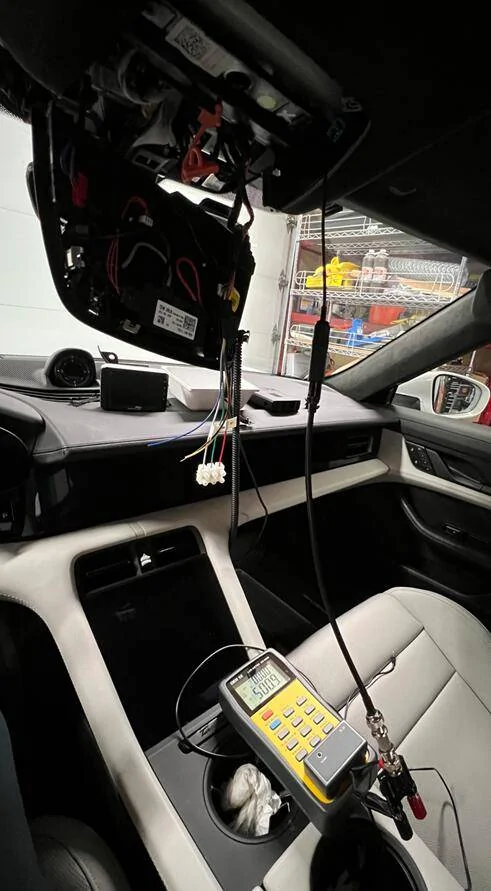
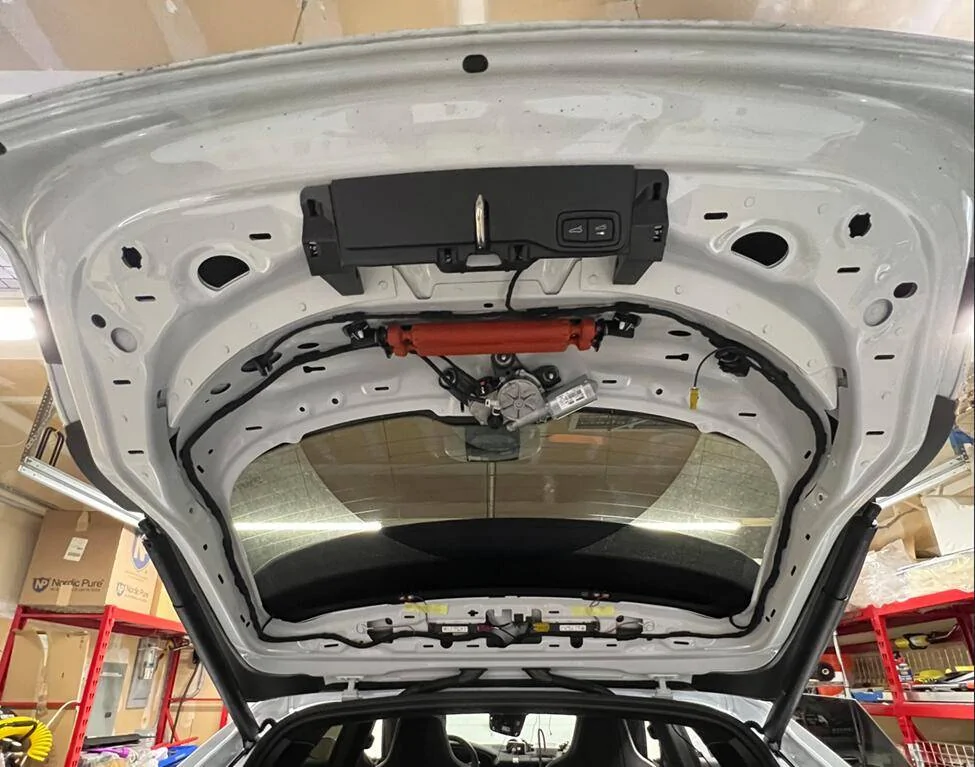
To access the pre-wire in the front you will need to remove the overhead console (2 screws under the 2 grills on each side of it which just pop out). I also recommend taking out both sun-visor clips (not the actual sun-visor hinge mounts), their top cover just pops off and they come out with a gentle pry. Lastly, you will need to unscrew the 2 screws holding the headliner. Here is what it looks like in the car.

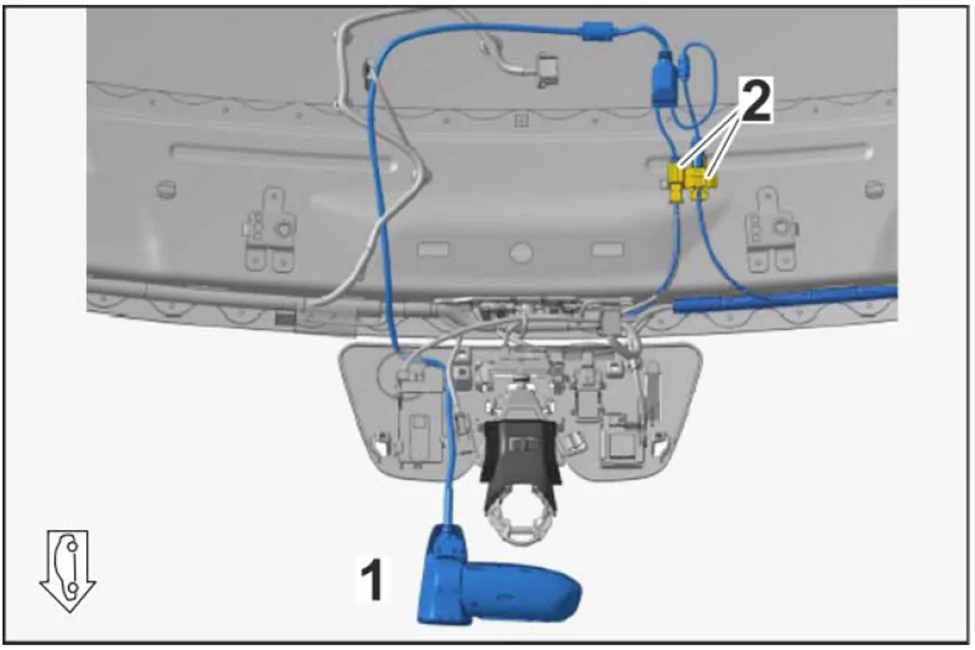
There are 2 connectors pre-wired under the front headliner, 1 Fakra coax male and one six pin male connector for power. Here is where the connectors are in the front (#2 in picture below, from Porsche dashcam installation document)

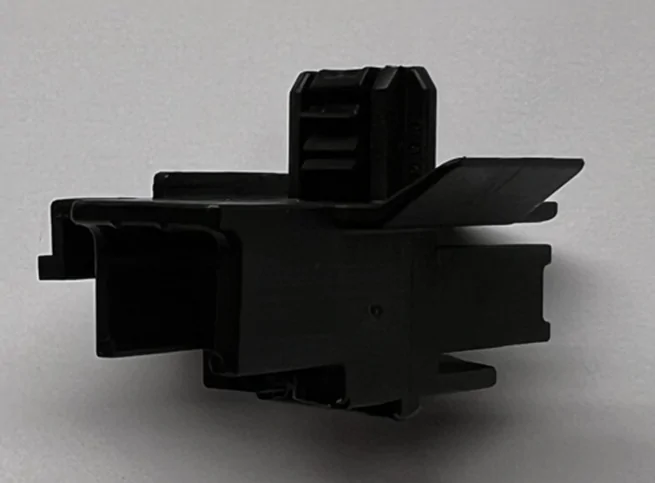
The connectors are in a plastic holder which is attached to the roof metal via a plastic clip which looks like this:

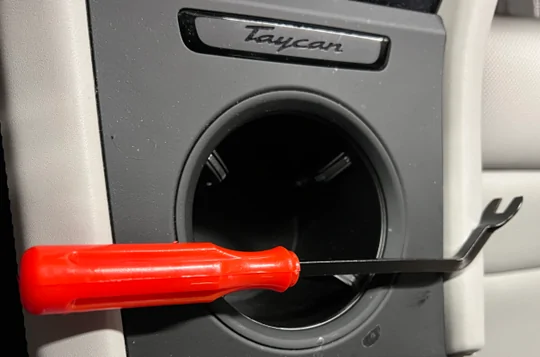
It’s easily detached from the roof using a pry tool like this:

The coax connector is a 50 Ohm impedance straight shot to the rear of the car. I measured the impedance and it came out at 59.94Ohms, but I think the additional characteristic impedance might have come from the fact that I was using a number of connector converters (see picture below).

When I measured the characteristic impedance of the Blackvue coax wire using the same setup, it came out to 59.94Ohm exactly as well, so I’m pretty confident the Porsche pre-wire matches the Blackvue impedance very well (it’s also been working on my car just fine since the install).
The 6 pin power connector is wired as follows (this is a picture of the female end that plugs into the prewire):


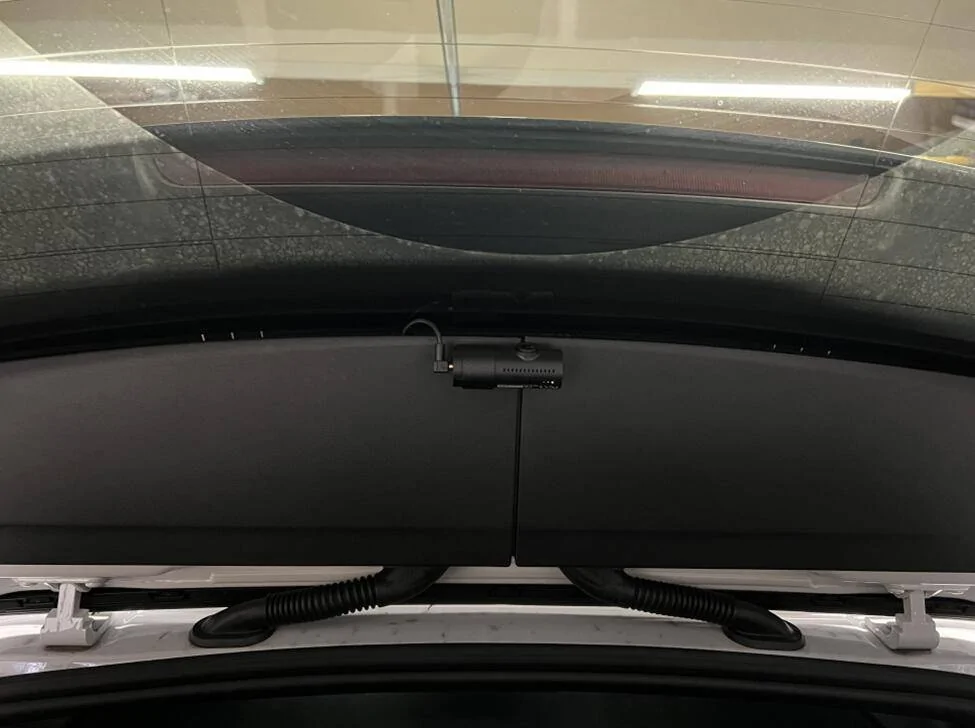
To access the rear you will need to remove at least the bottom panel on a CT hatch, but to run the wire to the top of the window where I chose install my dashcam, you will need to remove the other 2 panels too. The bottom panel is just clipped on, the top one are also attached by clips but each has a single screw you need to undo before unclipping them. Here is what the rear hatch looks like after removing the bottom panel (in this picture I was testing the rear dashcam using a test cable).

Here is what it looks like with all 3 panels removed:

For sedan rear instructions, please see attached bulletin PDF
Parts that you will need:


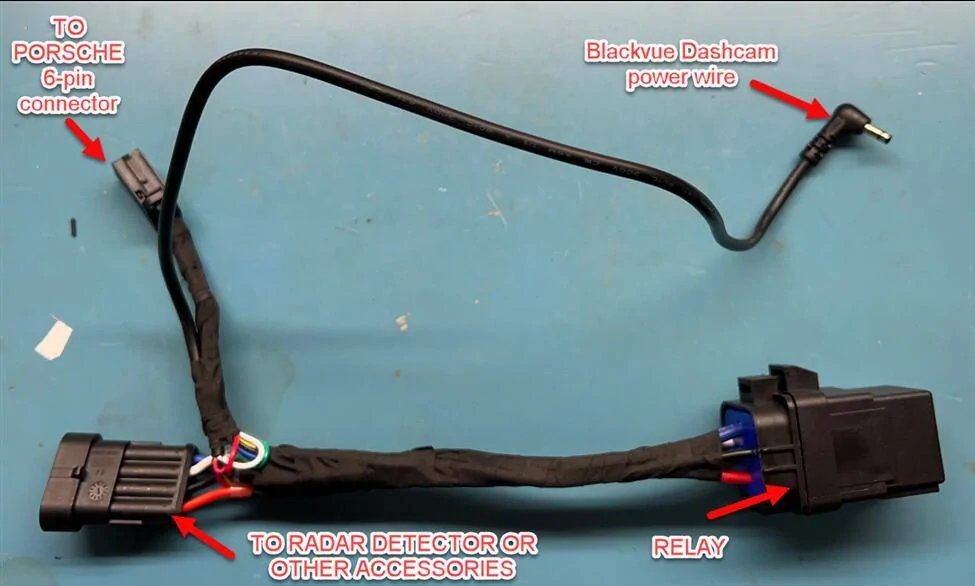
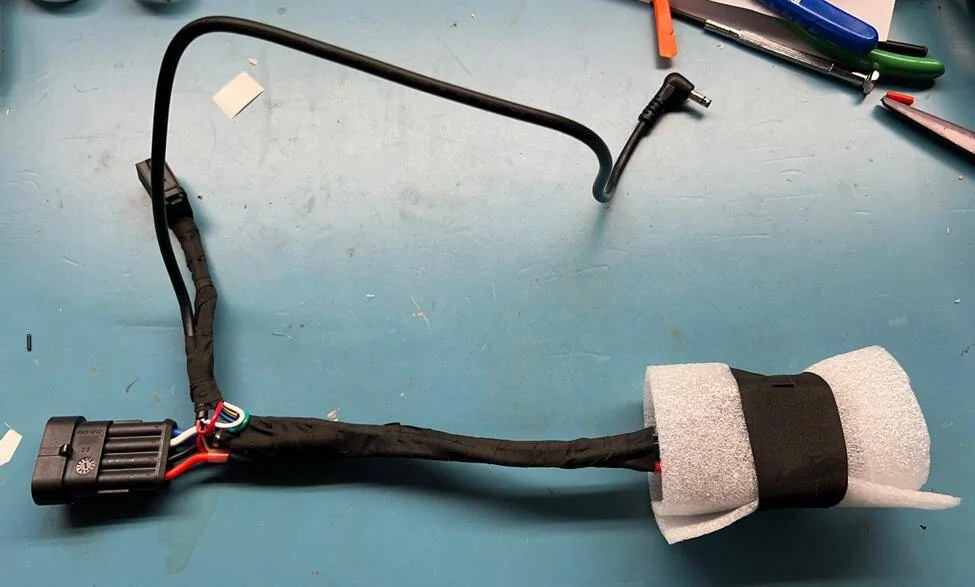
For power delivery I built myself a power harness. I added an accessory connector with GND, BATT, ACC, and RELAY-BATT from the relay to use for radar detector or future accessories).

I wrapped the relay in some foam before installing in the car to ensure it doesn’t rattle while driving.

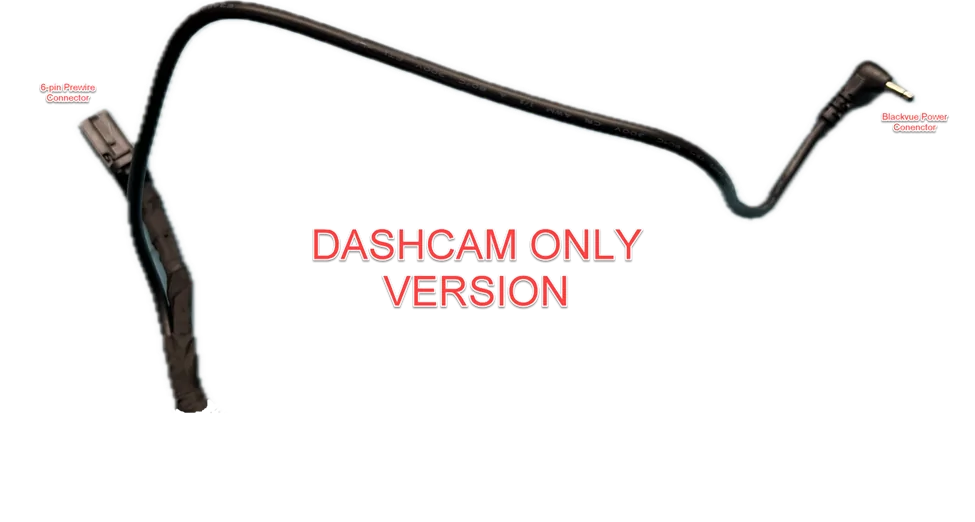
If you’re wiring only the dashcam which supports both BATT and ACC connections, you don’t need the relay or the accessory connector on the bottom of this picture, so it would look like this – much simpler to make too.

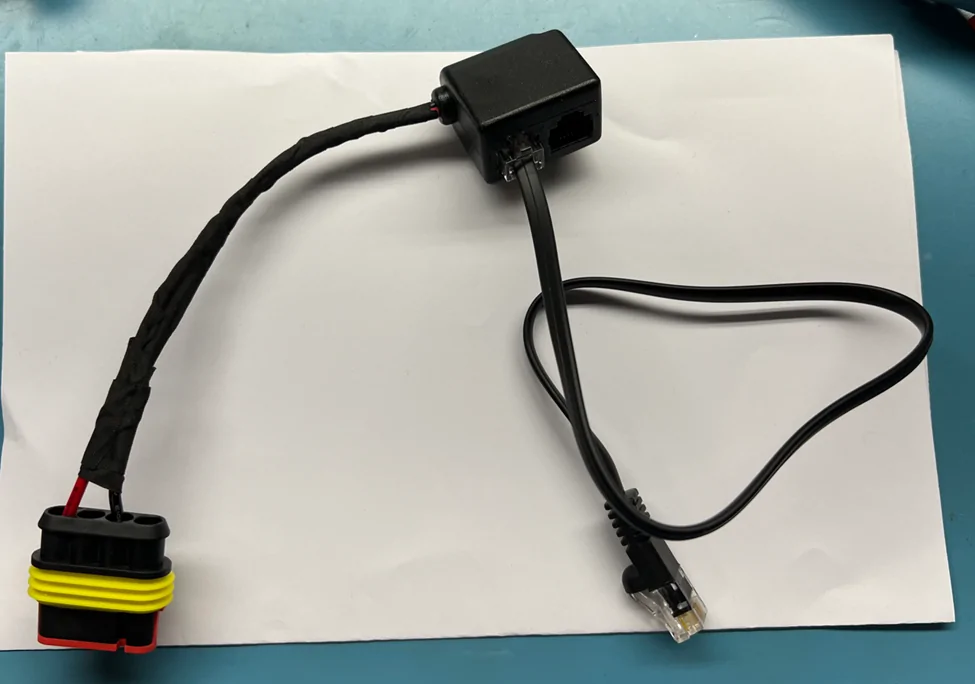
Then for the radar detector a simple harness that will plug into the above accessory connector:

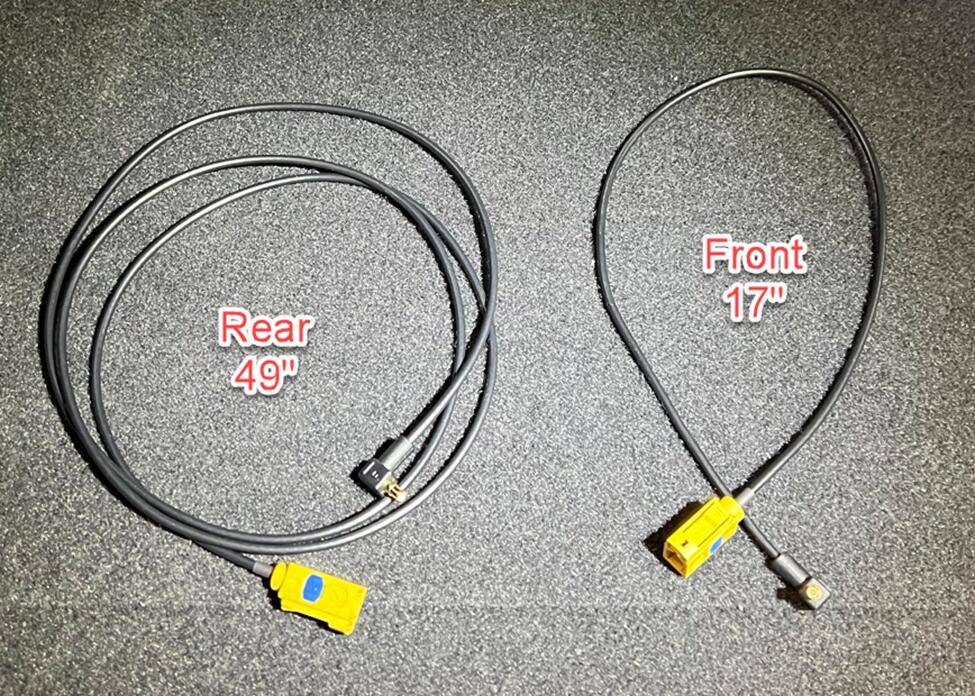
For coax/video cable, you will need to make a couple of Fakra to Blackvue cables. Mine ended up being 17 inches for the front, and 49 inches for the back. NOTE, crimpers for the center pin are expensive for the Fakra connectors (as they are very small gauge) but only needing 2, you should be able to solder them (I did). The outside crimp can be done with many other crimpers. Here are the 2 finished cables.

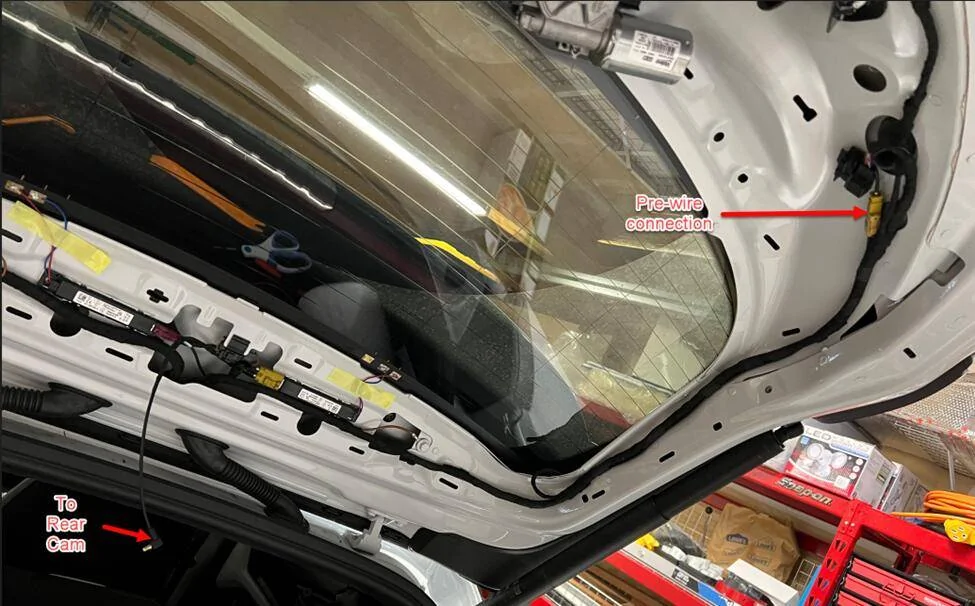
And here is the rear hatch wired up with the longer one (I ran the wire along other Porsche harness). I never used the rear power connector since Blackvue sends power to the rear camera via the video coax cable. For the front connection, I also wrapped it in some foam before installing to prevent it from rattling under the headliner.

On the front, the relay will need to be pushed a little back to have enough room. I made sure I kept the 6 pin power connector easily accessible by just removing the mirror base cover. This way if there is ever any question whether or not my installation is interfering with any Porsche electronics, I can disconnect it all with just a pry tool (or a credit card).

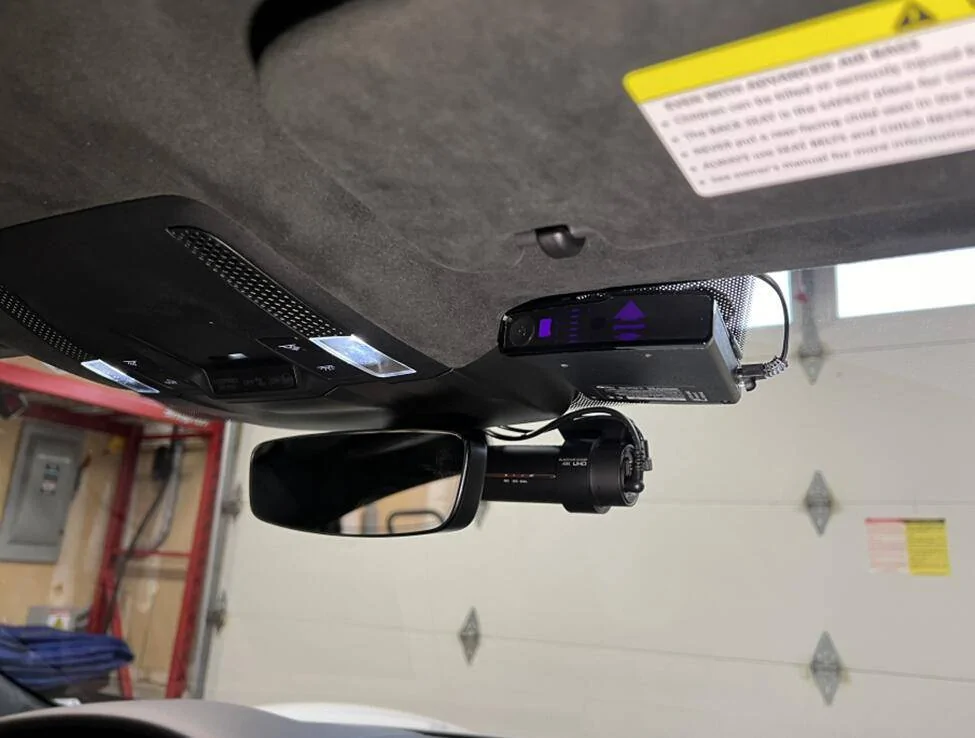
After all said and done, it looked something like this:


I hope this helps someone save some time. It also makes the dashcam + radar detector install 100% removable, should you want to, as well as easily disconnected in case you ever run into any issues with the shop diagnosing things and thinking your install may be interfering.
Note: Thanks to @fastlorenzo for posting results of his pre-wire investigation in another thread. His information saved me a bunch of time. This post is intended to save even more time to the next person attempting to use Taycan dashcam pre-wire to install a dashcam, radar detector, or other accessories.
Some information on the dashcam pre-wire:
To access the pre-wire in the front you will need to remove the overhead console (2 screws under the 2 grills on each side of it which just pop out). I also recommend taking out both sun-visor clips (not the actual sun-visor hinge mounts), their top cover just pops off and they come out with a gentle pry. Lastly, you will need to unscrew the 2 screws holding the headliner. Here is what it looks like in the car.
There are 2 connectors pre-wired under the front headliner, 1 Fakra coax male and one six pin male connector for power. Here is where the connectors are in the front (#2 in picture below, from Porsche dashcam installation document)
The connectors are in a plastic holder which is attached to the roof metal via a plastic clip which looks like this:
It’s easily detached from the roof using a pry tool like this:
The coax connector is a 50 Ohm impedance straight shot to the rear of the car. I measured the impedance and it came out at 59.94Ohms, but I think the additional characteristic impedance might have come from the fact that I was using a number of connector converters (see picture below).
When I measured the characteristic impedance of the Blackvue coax wire using the same setup, it came out to 59.94Ohm exactly as well, so I’m pretty confident the Porsche pre-wire matches the Blackvue impedance very well (it’s also been working on my car just fine since the install).
The 6 pin power connector is wired as follows (this is a picture of the female end that plugs into the prewire):
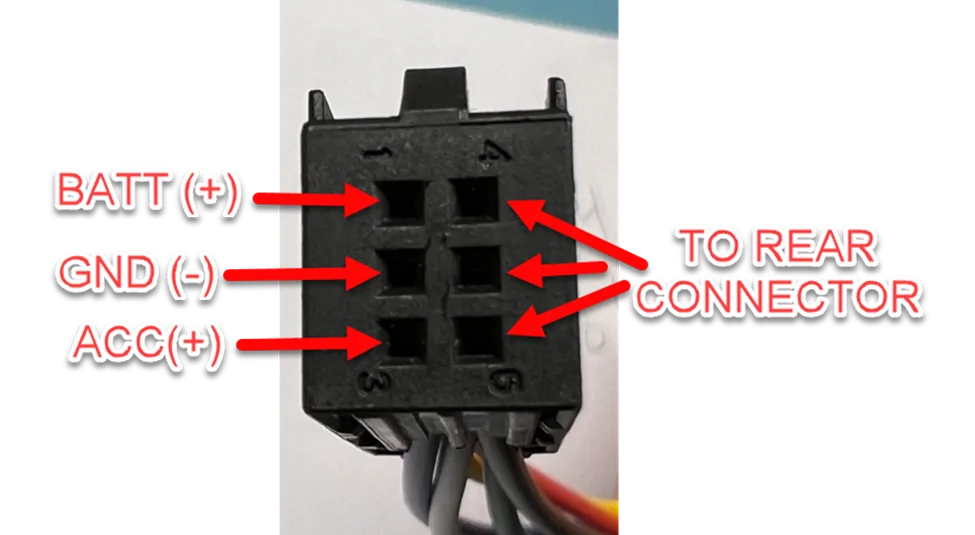
- Pin 1 - BATT is a permanent 12V positive (actually typically 13.8-14.4V)
- Pin 2 - GND is ground or negative terminal for 12V
- Pin 3 - ACC is switched 12V positive which for some reason measure ALWAYS 340mV lower than BATT. Not sure why that is but it could be voltage drop due to existing load on that power rail – for that reason I chose to add a relay to my setup to power the radar detector, rather that running is straight from ACC. Blackvue dashcam already does this natively, hence it has separate BATT and ACC connections, and it draws almost all of its power from BATT, using ACC to know when to drop to low power parking mode.
- Pins 4,5,6 - go to the back 6 pin connector (which only has 3 pins wired).
To access the rear you will need to remove at least the bottom panel on a CT hatch, but to run the wire to the top of the window where I chose install my dashcam, you will need to remove the other 2 panels too. The bottom panel is just clipped on, the top one are also attached by clips but each has a single screw you need to undo before unclipping them. Here is what the rear hatch looks like after removing the bottom panel (in this picture I was testing the rear dashcam using a test cable).
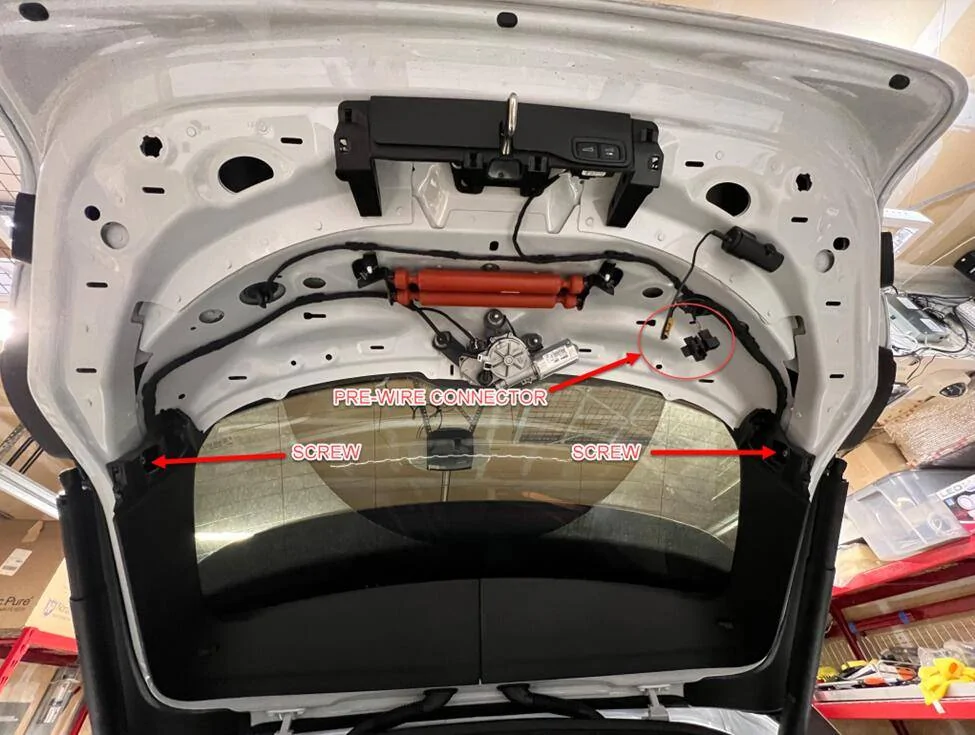
Here is what it looks like with all 3 panels removed:
For sedan rear instructions, please see attached bulletin PDF
Parts that you will need:
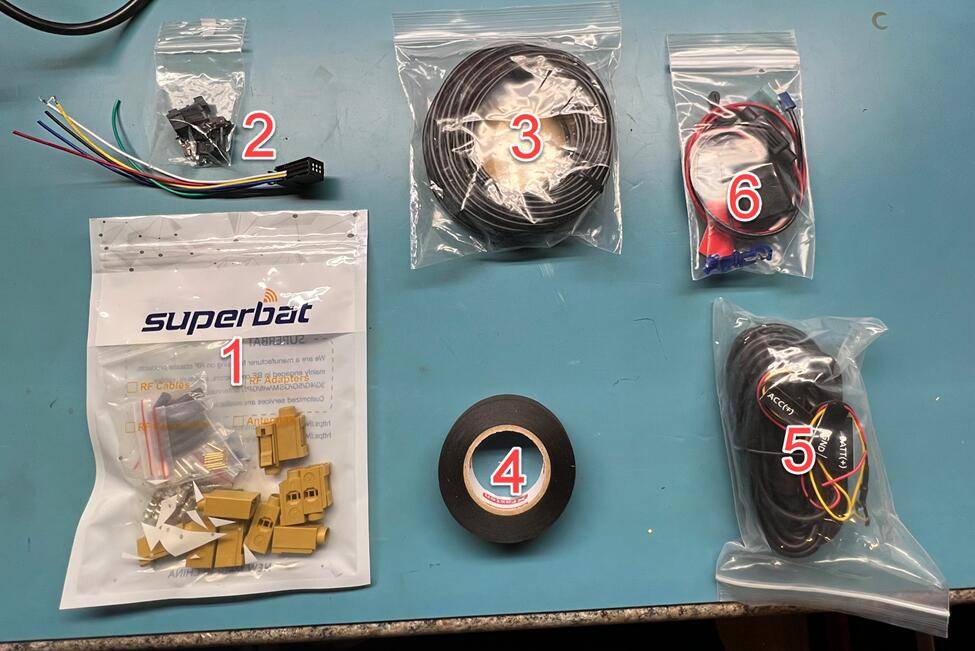
- Fakra K Female connector (e.g. Amazon link here)
- VW/AUDI/SKODA/PORSHE 6-pin seat connector (I found some on ebay, picture shows one pre-wired already and a couple ready to wire ones)
- Blackvue dashcam coax wire
- Automotive wire harness tape
- Blackvue dachcam power wire
- (OPTIONAL) radar detector hardwire connector
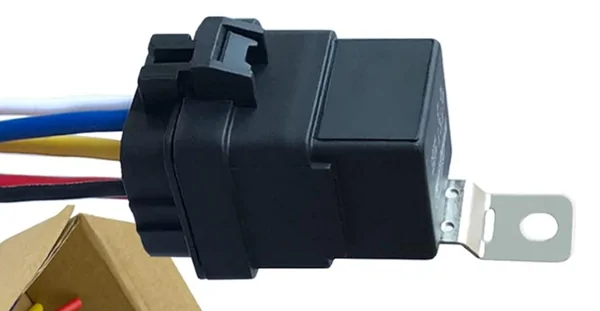
For power delivery I built myself a power harness. I added an accessory connector with GND, BATT, ACC, and RELAY-BATT from the relay to use for radar detector or future accessories).
I wrapped the relay in some foam before installing in the car to ensure it doesn’t rattle while driving.
If you’re wiring only the dashcam which supports both BATT and ACC connections, you don’t need the relay or the accessory connector on the bottom of this picture, so it would look like this – much simpler to make too.
Then for the radar detector a simple harness that will plug into the above accessory connector:
For coax/video cable, you will need to make a couple of Fakra to Blackvue cables. Mine ended up being 17 inches for the front, and 49 inches for the back. NOTE, crimpers for the center pin are expensive for the Fakra connectors (as they are very small gauge) but only needing 2, you should be able to solder them (I did). The outside crimp can be done with many other crimpers. Here are the 2 finished cables.
And here is the rear hatch wired up with the longer one (I ran the wire along other Porsche harness). I never used the rear power connector since Blackvue sends power to the rear camera via the video coax cable. For the front connection, I also wrapped it in some foam before installing to prevent it from rattling under the headliner.
On the front, the relay will need to be pushed a little back to have enough room. I made sure I kept the 6 pin power connector easily accessible by just removing the mirror base cover. This way if there is ever any question whether or not my installation is interfering with any Porsche electronics, I can disconnect it all with just a pry tool (or a credit card).

After all said and done, it looked something like this:
I hope this helps someone save some time. It also makes the dashcam + radar detector install 100% removable, should you want to, as well as easily disconnected in case you ever run into any issues with the shop diagnosing things and thinking your install may be interfering.
Sponsored
Attachments
-
1.5 MB Views: 2,782
Last edited:
")
